Showing posts with label cooking. Show all posts

January 18, 2014

Fudgy Chocolate Mug Cake


"Let's face it, a nice creamy chocolate cake does a lot for a lot of people; it does for me." 

Some things just aren't good for me. This cake is one of those things.

I can justify it by saying I'm not making a whole pan of brownies that will tempt me every time I pass the kitchen. But it is dangerously easy. I paged through several recipes that all involved as many ingredients as baking an actual, full size cake, and finally came across this one. Simple.

Especially on these Midwestern winter nights, a warm, gooey chocolate cake is the best kind of dessert. After everyone else is "pajama-ed" as Millie says, and tucked away into their beds, it's time for me to exhale and spill onto the couch. I find the softest blanket, click into great blogs or roam Pinterest, and sometimes, sneak a mug of fudgy cake. Once, I made a little one for Millie as a special treat, and she was amazed that we were eating cake from a cup. It's right up there next to corn dogs on sticks.

So. This is not Paleo or low carb or gluten free or 'clean' or anything remotely close. But it is a perfect way to satisfy that sudden, intense chocolate craving we've all been known to get.

The only note I should make is that this is not the time to be a gourmet cook- one, because this is a microwave cake, for goodness sake, but two, because you need to measure this out. Don't do a dash of this and a bit of that. Not that I would know from experience.

(I originally found the recipe (if you can even call it that) here.)
Fudgy Chocolate Mug Cake 

- 4 tablespoons of brownie mix
- 2 tablespoons milk or water (I've only made this with milk)

Pour both ingredients into a fairly wide-mouthed coffee mug. Stir until there are no big lumps/dry spots of mix. Microwave for about 60 seconds, adding 10 seconds more at a time if needed (mine takes about 70 seconds). Do not overcook- it's much better underdone than overdone. The top should look moist but cake-like. You could top the cake with whipped cream, chocolate syrup, or even a bit of frosting, but I prefer mine as is.

November 22, 2013

Heirloom Gingerbread Cookies & A Black's Bakeware Giveaway

"No one who cooks, cooks alone. Even at her most solitary, a cook in the kitchen is surrounded 
by generations of cooks past, the advice and menus of cooks present, the wisdom of cookbook writers." 

One of the things I love most about the holidays is the food. Now that I have little ones around, it means I get to play Santa. I'll be sure to stress how extremely important it is to leave cookies and milk for him. I'll specify, too, exactly the kinds of cookies he prefers.

Recently, I was contacted by Black's Bakeware for a product review, and thought it would be a perfect occasion to share a good recipe just in time for Christmas baking. And nothing, my friends, is more Christmas-y than gingerbread.


Thanks to Kate for sending this heirloom gingerbread recipe with me. Remember how we discussed my adoration of all things ginger? It's still going strong, so I couldn't wait to bake these cookies. They were wonderful!

Gingerbread Boys (in my case, squares)
(makes 4-5 dozen)

Ingredients:

1 cup margarine
1 cup sugar
1 egg
1 cup mild molasses
2 tablespoons vinegar
5 cups flour
1 1/2 teaspoons baking soda
1/2 teaspoon salt
1 teaspoon ginger
1/2 teaspoon cinnamon
1/2 teaspoon ground cloves

Directions:
Cream margarine and sugar. Add egg, molasses, and vinegar. Beat well. Sift together remaining ingredients and stir into molasses mixture. Cover and chill in refrigerator for about 3 hours (for those of you who tend to have sticky dough, this part is the most important!). Roll out dough to 1/2" thickness on floured surface. Cut with floured cookie cutter. Place 1 inch apart on greased cookie sheet. Bake a 375 for 5-6 minutes or until slightly brown at edges. Cool on pan one minute, then remove to rack to cool. Use an icing of powdered sugar and milk to decorate. (I used powdered sugar and orange juice. Can also use Red Hot candies, sprinkles, etc. for decoration - just add them before baking.)


I really liked this cookie sheet. It's very thin, which is great for storage in my tiny apartment kitchen. It was easier to clean than some others I've used, and washes in the dishwasher just fine. I also love the fact that Charlie Black, the inventor, is an Army veteran- you can read more about him on the website. I've used the sheet for several other things too- homemade steak fries, bread sticks, chicken fingers, etc.- and they all baked perfectly on it.


I asked Black's if they would send me an additional cookie sheet for a giveaway, and they graciously agreed. I'm excited to be able to share one with a lucky winner. So enter below for your chance to win!


November 13, 2012

Orange Cream Cheese Bread Recipe


Once upon a time with less hormones, food sounded really good to me. And when it did, I stumbled upon this quick bread recipe. The site I got the recipe from has a faulty link now, so I'll share the recipe with you below.

This was another simple, easy bread to make, and had a really great, smooth texture. I think the cream cheese had a part in that. I also liked that it soaked in the orange juice after baking. The only part I needed to change was to add a bit of icing on top- the bread itself wasn't orange-y enough for my liking, so I mixed up a little glaze of powdered sugar, orange juice, and a little bit of vanilla, and drizzled that over the bread once it was cool. It gave it the kick I felt it was missing.

I made this a month ago when a friend had a baby (hence the "congrats" on the tag above), and gave one loaf to her, keeping the other for us. Once I'm back to eating normally, I can't wait to make this one again.

P.S. If you're in a particularly autumn kind of mood, you must try my mama's pumpkin bread recipe!

Orange Cream Cheese Loaf
Ingredients:
1 8 oz package of cream cheese, softened
1/2 c shortening
1 2/3 c granulated sugar
2 eggs
2 1/4 c all purpose flour
1 tsp salt
1 Tbsp baking powder
1 c milk
1/2 c chopped walnuts
2 Tbsp orange zest
1/4 c orange juice

Directions:
1. Combine cream cheese and shortening, creaming well.
2. Gradually add sugar, beating until light and fluffy.
3. Add eggs, beating well after each addition.
4. Combine flour, baking powder and salt;  add to creamed mixture alternating with milk, beginning and ending with flour mixture.  Mix well after each addition.
5. Stir in walnuts and orange peel.
6. Pour batter into 2 greased and floured loaf pans.
7. Bake at 375 F for 55 minutes or until wooden toothpick comes out clean.
8. Let cool in pan for 10 minutes.  Then sprinkle orange juice over loaves.  Remove to wire racks to finish cooling.
9. (Optional) Make simple glaze of powdered sugar dissolved in small amount of orange juice, adding vanilla extract to taste. Drizzle lightly over cooled loaves, or drizzle over slice when served.

August 2, 2012

Millie's Second Birthday- Vintage Country Sweet Party {Part 2- The Rose Cake and Menu}

Photobucket

I want to write about this cake first- you have no idea. But first, a very quick rundown of the menu:
I served a simple country menu of crockpot barbeque chicken (shredded and on buns), sweet corn, homemade macaroni and cheese, chips, and Rice Krispie treats with a few dashes of sprinkles thrown in for fun (click on links for the recipes). I found some great red and white checkered plates and napkins at the Dollar Store, too.

Photobucket

Photobucket

Photobucket

Okay, now the good stuff. The main reason for a birthday party- at least, in my opinion? The cake.

I decided to work up some courage and make my own icing as well as decorated the cake. It's the fanciest I've ever done (even though it ended up being really easy!) so I was proud I didn't ruin it! I made a simple cherry chip cake from a box mix and I used I Am Baker's "Perfect Crusting Buttercream" recipe, but tweaked it a little to the following after reading through the comments:

Adapted Crusting Buttercream
Entire 2lb bag of powdered sugar (8 cups)
3/4 milk Crisco
1/4 cup salted butter
1 tsp vanilla extract
1/4 tsp almond extract
1/4 tsp butter flavoring
3/4 cup milk 

(I also added the tiniest bit of Red Wilton Icing Color for the pink shade.)

And can I just say when she actually responded to my comment with, "What a great adaptation!! Well done!", I was beaming. Anyhow, you can find the rose cake tutorial here. I also watched her video about 5 times in a row, and that helped me get it down a bit better. Although it does make a lot of icing, I ended up having just enough.  (You can find the printable cake bunting here.)

Photobucket

Photobucket

Photobucket

Photobucket

Photobucket

Photobucket

Like my apron? I love it! My mom made it for me out of vintage fabrics, and I think it's so sweet!

Photobucket

Success!

Photobucket

Photobucket

The finished product.

Photobucket

Millie approved, and I got to eat a couple leftovers slices, so everyone was happy!

May 17, 2012

Raspberry Almond Bread

Photobucket

As most of you know by now, I'm a sucker for quick breads. The thought of using yeast is so daunting to me for some reason. Besides, making quick bread for a dessert is easier than just about any dessert you can make (obviously, the frozen Jello dusted grapes are an exception to that).

Photobucket


I stumbled across this recipe on Pinterest, and it sounded delicious. I modified a few things (doubled the recipe, used thawed frozen raspberries instead of fresh, etc.) but it still turned out well. And no, that is not a KitchenAid mixer. I think I'm the only blogger who doesn't have one- someday, it will be mine!

Photobucket


The biggest challenge to this bread? Not eating those delicious raspberries before they make it into the batter.

Photobucket


It looks pretty already! The color actually changes into a deep blue/purple once it's baked.

Photobucket

The other challenging part about this bread? The wait for it to bake. It is a bread that, like chili, is definitely best the second or third day. Did I eat it the first night? Absolutely. But I enjoyed it a lot more on the third night.

Photobucket


Millie isn't good at waiting either. It makes her sad. We made up for it by sharing a slice for breakfast this morning.

Photobucket


Raspberry Almond Bread
(originally found here, but doubled because no one should ever bake just one loaf of bread)

Ingredients: 
4 cups all-purpose flour
2 teaspoon baking powder
2 teaspoon baking soda
1 teaspoon salt
1 cup (2 sticks) unsalted butter, softened
2 cups sugar
1 teaspoon almond extract
4 eggs
4 Tablespoons sour cream
2 cups raspberries (I used frozen ones, thawed and drained first.) (can substitute strawberries or blueberries)
2/3 cup slivered almonds (usually the small bags are 1/3- ½ cup- I used one bag slivered almonds and one bag naturally sliced almonds, even though it was a bit more than 2/3 cup)

Directions:
Preheat oven to 325 degrees. Grease two 9 x 5-inch loaf pans.

In a medium bowl, whisk together the flour, baking powder, baking soda and salt. Set aside.

In a large bowl, using an electric mixer, cream the butter, sugar and almond extract until very light and fluffy, about 3 minutes. Beat in the eggs one at a time, beating well after each addition. Gently mix in the flour and sour cream. Fold in the berries and almonds.

Spoon the batter into the prepared pans. Bake in the center of the oven for 55 to 60 minutes, or until a toothpick inserted into the center comes out clean.

Cool the bread in the pan for 20 minutes, then invert onto a wire rack, turn right side up, and cool completely.

Photobucket

April 18, 2012

Frozen Jello-Dusted Grapes

Photobucket

Yesterday, I promised I would tell you about my newest love. Millie and I are addicted.

Frozen. Jello. Dusted. Grapes.
The end.

I feel like my parents didn't love me as much as they should have now, because I had never heard of frozen grapes before Pinterest. Apparently, it's something people do. They are amazing all by their lonesome, it turns out.

But then, by washing the grapes, and pouring a package of Jello mix on them? Heaven. This time, I used green grapes and lime flavored Jello, but I would think any frozen seedless grapes with any flavor of Jello would be delicious.

I already know I'll be making them all summer long.

The Official "Recipe"

1. Wash a bag of grapes.
2. Throw them into a gladware container or freezer bag, and pour the Jello mix over them.
3. Seal it up, shake it to coat all the grapes.
4. Pop it in the freezer, wait impatiently, and be amazed.

Photobucket

March 22, 2012

Garlic Scares Away the Witches: Cheddar Garlic Bread

Photobucket

I've never experienced the cooking-as-therapy type of calm in the kitchen. Slowly but surely, though, I'm getting much better at cooking and baking. Not too many years ago, I would despair if there were any instructions other than "Unwrap plastic and cardboard from pizza. Bake at 425."

And today was just one of those days. I woke up in a good mood, but felt defeated about half an hour into my morning. The weather was cool and the gray sky looked as sad as my spirits. I found myself leaning against the counter top in the kitchen, browsing through recipes. Some magical, fairy voice seemed to be singing, "Bread!" There is something so homey and comforting about it.

So mixing bowls and ingredients were gathered. The spoon was stirred in a slow motion at first, then faster. I scraped the sides to get all the bits of dough, and swirled it into the pan. I found myself confident enough to read some reviews and combine a few recipes for something that became my own. The seasonings were already enveloping the entire apartment. Ah, I thought. So this is that baking catharsis I've heard so much about. I even baked a couple loaves of Snickerdoodle bread after that, sending one loaf with a pregnant friend and one to my dad. It felt good to stand barefoot on the linoleum and do something simple and rewarding. Maybe garlic scares away negative things after all.

Photobucket

It's a bit savory and slightly sweet, and a little reminiscent of those amazing Red Lobster biscuits.

Cheddar Garlic Bread

Ingredients
3 cups all-purpose flour
4 and 1/2 teaspoons baking powder
1 cup shredded sharp cheddar cheese
1/4 cup sugar
2 teaspoons garlic powder

3/4 teaspoon salt
1/2 teaspoons Italian seasonings, divided
1 and 1/2 cups milk
1/4 cup vegetable oil
1 egg

Preheat oven to 350 degrees. Combine flour, baking powder, cheese, sugar, garlic powder, salt, and 1/4 teaspoon Italian seasoning. In a separate bowl, combine milk, oil, and the egg. Stir into the dry ingredients until just moistened.

Pour into one greased 9x5 loaf pan. Sprinkle with additional 1/4 tsp Italian seasoning. Bake for about 50-60 minutes, or until top is golden and a toothpick inserted into the middle comes out clean. After removing from over, sprinkle with about 1 teaspoon of cheese.

Allow bread to cool in the pan for 10 minutes, then transfer to a wire rack to cool. Serve warm or cool.

February 19, 2012

Snickerdoodle Cinnamon Bread

Photobucket

As soon as I stumbled across the original recipe for this quick bread, I was drooling. However, I didn't have cinnamon baking chips, so I had to improvise. This bread was delicious, and reminds me a lot of the Amish Cinnamon Bread my mom used to make.

After baking, I can't say I really understand the need for any kind of chips, but to each her own. Next time, I'll omit them altogether, but for this first attempt, I took white chocolate Ghirardelli chips, moistened them, and covered them in cinnamon sugar. It worked well for me.

If you do want to use the cinnamon chips, be sure to hunt for them, since they tend to be a seasonal item. You can buy them online, but I had no patience nor the desire to spend that much money on chips! (UPDATE: I was able to find them at Schnucks, so you might try that if you'd like to use them!)

This was also my first time using my Christmas present- my ML-L3 remote for my camera. Can I just let you know that it's pretty awkward setting up a huge tripod in a tiny kitchen?

Photobucket

Photobucket

Anyway...on to business:


Snickerdoodle Cinnamon Bread
2 1/2 cups all purpose flour
2 tsp baking powder
1/2 tsp salt
2 tsp cinnamon
1 cup butter, softened
2 cups sugar
3 eggs
2 tsp vanilla
1 cup sour cream
1 1/2 cups cinnamon chips (As stated above, I used only 1 cup of white chocolate chips covered in cinnamon sugar)
2 Tbs flour
Topping:
2 Tbs sugar
2 tsp cinnamon
Combined the 2 1/2 cups flour and baking powder in a bowl. In a separate bowl, cream butter and 2 cups sugar, salt and cinnamon until fluffy. Add eggs one at a time, mixing well after each addition. Add vanilla and sour cream and mix until combined. Add flour mixture stirring until just combined. Coat the cinnamon chips with 2 T. flour and stir into batter.
Pour into two 9×5 greased loaf pans. Combined 2 T. sugar and 2 t. cinnamon and sprinkle over the top of batter in the pans. Bake at 350º for 60 to 70 minutes until a toothpick inserted into a crack in the center of the loaf comes clean. (You may also use four to five greased mini loaf pans (5 3/4 x 3 1/4 x 2 1/4. Don’t fill more than 2/3 full. Bake at 350º for 35 to 40 minutes until a toothpick inserted into a crack in the center of the loaf comes clean.)
 Remove from oven and let cool 5 minutes before removing from pan. I recommend serving this warm (fresh or heated for a few seconds in the microwave).

Photobucket

January 24, 2012

The Best Potatoes in the Universe

Photobucket

I am the kind of girl who finds something she likes to eat, eats only that thing for a couple weeks straight, gets burned out, and moves on to the next craving. It's been that way as long as I can remember.

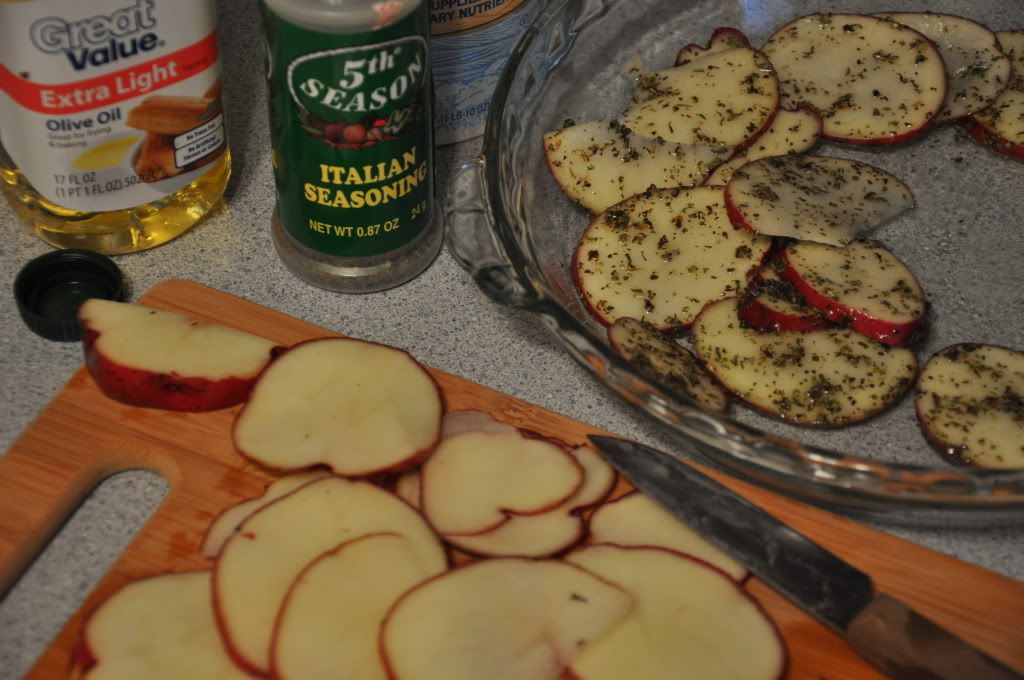
My current obsession is oven roasted potatoes. I found the original recipe here, and I've made these babies over and over during the meals when Sky is away at work. They are the easiest thing, too.

It's all about the texture on these. Just slice them super thin, and you'll get crispy edges that are out of this world good.

Photobucket

Best Potatoes in the Universe 

2 large potatoes
3 Tbsp olive oil (I never even measure this or the seasoning anymore.)
1 Tbsp Italian Seasoning
1 tsp salt
4 Tbsp Parmesan cheese

Slice the potatoes into slices- the big key to this recipe is to get them very thin so they will get crispy around the edges (about 1/4 inch). Put all potato slices, oil, seasoning, and salt into a Ziploc bag, and shake until the pieces are coated well. Line a baking sheet with foil (or I use a 8 x 8 pan-just be sure to not layer them too much) and put them in a single layer. Bake at 450 for 20 minutes, or until lightly brown. Top with Parmesan cheese (again, I just put enough on until it looks good- definitely don't use the whole 4 tbsp) and bake an additional 5 minutes.  

Photobucket

December 27, 2011

The Dessert Menu

Photobucket

We had a lot to eat on Christmas. I know everyone says that, but I've never baked so much in all my life. After some Googling and Pinterest, I decided all these deserts must be made. I should have remembered to keep a full pot of coffee hot while I made them...

Here is the rundown:

*Pistachio cranberry cookies (Good and easy, although I think they'd be better with homemade sugar cookie dough.)
*Orange gingerbread cookies with rum icing (Delicious. These were my favorite to eat- but the dough was so unbelievably impossible to work with that I felt like setting the bowl in the street and running over it with the car. Needless to say, I won't be making them again.)
*Grasshopper fudge cake (I really liked this. I'll be making it regularly, I think.)
*Nutella puppy chow (I skipped adding the hazelnuts)
*Peppermint ice popcorn (I kind of liked this twist on regular peppermint ice.)
*Dipped s'mores (Self explanatory.)
*Original Chex mix (In the oven, not the microwave- it's the only way to go.)
*Christmas wreathes (I ended up running out of steam before I could make them.)

I found a label template and made up little cards to display. It was more to make sure people knew what was what than it was to be cute, but I liked the look of them.

And here they are in action:

Photobucket

Photobucket

Photobucket

Photobucket

Photobucket

Photobucket

Did I mention it was a lot of food? This doesn't even include actual nutrition and substance- it's just the dessert section. We gave plates and bags to anyone who volunteered to take them, sent some with Sky to work, and even took a plate over to our crazy neighbor. I'm not exactly sure why I felt like making it all was such a great idea.

Oh, and next time? You're all invited over- at least to take a plate home with you!